How do I add a 12V outlet in my truck bed?

Check out your helpful results below!
Jump to a section, or see what you’ll get:
Jump to:
Scroll for the full guide ↓
  • 🎥 A step-by-step video walkthrough
  • 🧰 A tools & supplies checklist
  • 📋 Clear step-by-step instructions
  • ⚠️ Safety notes + pro tips
  • 🧑‍🔧 Connections to local pros (if you want help)

Video

Don't Let This Be You

Estimated Time:

Difficulty:

Tools

    Materials

      Steps

        Safety Notes

          Pro Tips

            Did this tutorial help?

            Send me this Do It Yourself tutorial via email

            Need a pro

            Need a pro?

            Tell us what went wrong and we’ll connect you with a trusted local pro.

            Please enter your name.
            Enter a valid email.
            Enter a valid phone number.
            Enter your ZIP/postcode.
            Pick a trade.
            Tell us a bit about the issue.
            Image must be under 3 MB.
            By sending, you agree to our Terms and Privacy.
            Free quotes No spam Cancel anytime
            diy4uai21-20
            Drill with bits, Wire stripper/crimper, Screwdriver set, Multimeter, Socket wrench set, Utility knife
            Always disconnect the battery before working on vehicle electrical systems., Use a fuse rated for the expected load to prevent fire hazards., Secure wiring away from moving parts and hot surfaces., Wear gloves and safety glasses when drilling or working under the vehicle.
            Disconnect the negative terminal of the truck battery to prevent electrical shorts. Choose a flat, accessible location in the truck bed wall or side panel for the outlet. 
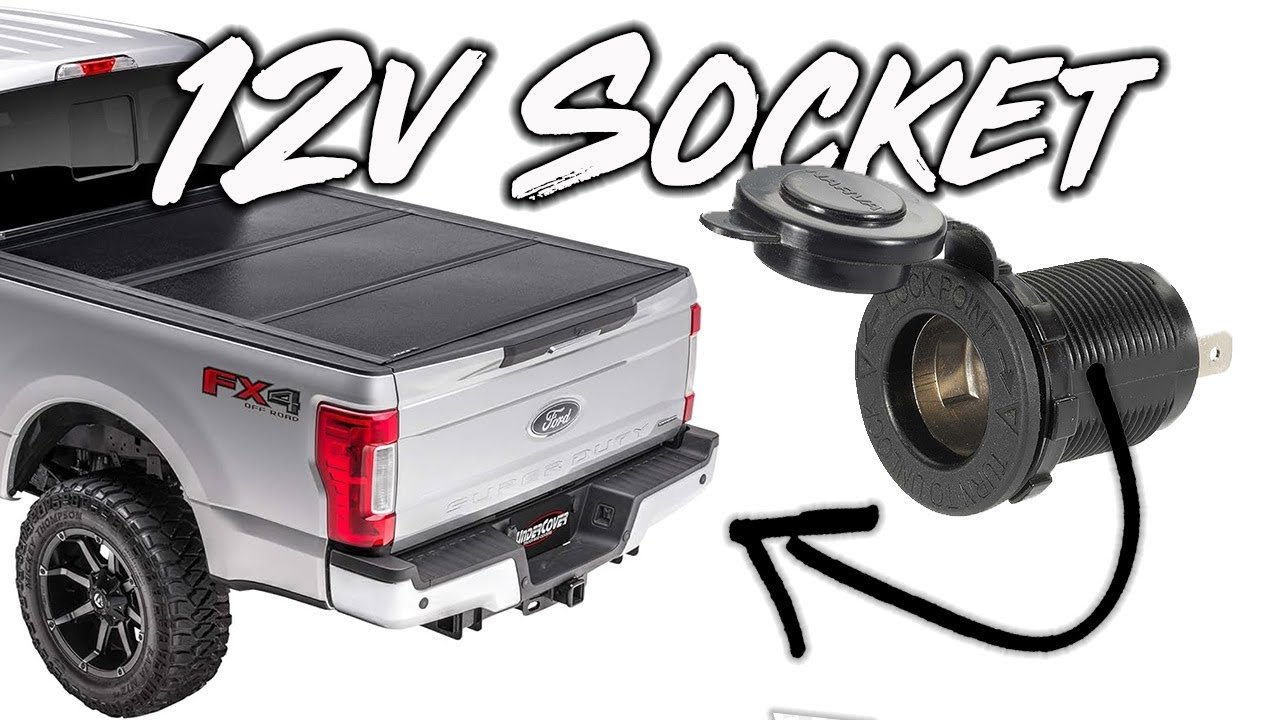
Drill a hole sized to fit the 12V outlet socket, avoiding structural or fuel system components. Insert the outlet socket into the hole and secure it using the included mounting hardware. Route the power and ground wires through the truck bed and undercarriage toward the cab or fuse box. Install an inline fuse holder on the positive wire close to the power source for circuit protection. Strip the end of the positive wire and crimp on a ring terminal for connection to the power source. Connect the positive wire to a 12V accessory or battery terminal, ensuring a solid connection. Strip and crimp a ring terminal on the ground wire and attach it to a clean chassis ground point. Cover exposed wiring with wire loom or conduit to protect against abrasion and moisture. Secure the wiring along the frame or underbody using zip ties every few feet to prevent sagging. Reconnect the negative battery terminal once all wiring is secure and connections are verified. Use a multimeter to check for 12V power at the outlet to confirm proper installation. Plug in a 12V device to test functionality and ensure the outlet is working correctly. Reinstall any interior or bed panels that were removed during the wiring process. Double-check that the fuse is properly seated and rated appropriately for the outlet load. Ensure all connections are tight and insulated with electrical tape where needed. Label the fuse or circuit if added to a fuse block for future reference. Clean up tools and materials from the work area to complete the installation. Monitor the outlet during first use to ensure it does not overheat or lose power.
            12V outlet socket, Automotive-grade wire (12-14 gauge), Inline fuse holder with fuse, Ring terminals, Wire loom or conduit, Zip ties, Electrical tape, Self-tapping screws
            Medium
            Use marine-grade connectors for better corrosion resistance in truck beds., Choose a switched power source if you want the outlet to turn off with the ignition., Label the outlet with its voltage and fuse rating for future reference., Test all connections with a multimeter before final assembly.
            120
            https://www.youtube.com/watch?v=EwO4LMM-rSc
            "https://youtu.be/9n6em1ZBOvI?si=rWqitTC3UuZtYa7y" ​